Install Guide

2015-2026 Ford F-150 Gas Tank Skid Plate

2015-2026 Ford F-150, F-150 Raptor, F-150 Raptor R
Part #JG-F150-GEN7-SKID-GAS
Difficulty
Moderate
Steps
12
2015-2026 Ford F-150 Gas Tank Skid Plate
1

Bolt Skid Sections Together

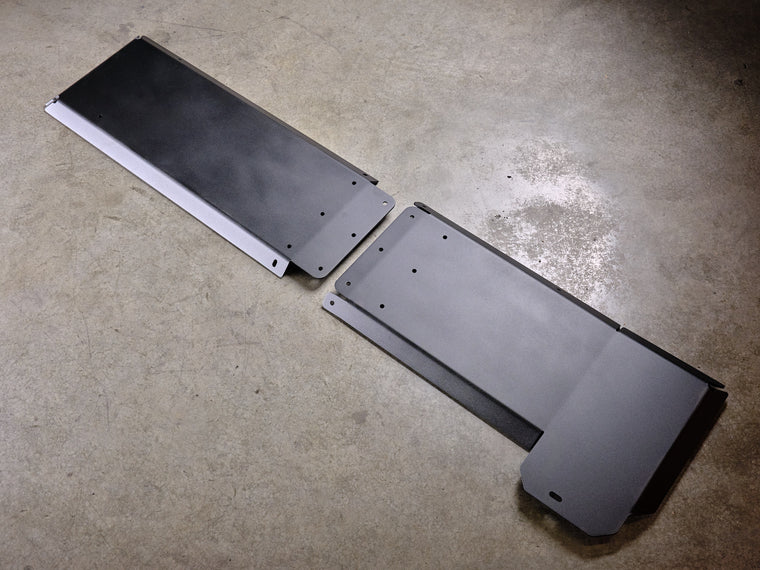
The gas tank skid will come in two pieces that need to be bolted together prior to being mounted on your truck. Do this on a long table or on the ground prior to installing the skid plate. The skid will be bolted together using the provided (8) 3/8"x1" bolts, (16) 3/8" washers, and (8) low profile 3/8" nylock nuts. The front portion of the skid will be bolted on top of the rear portion as shown in the picture below, with bolts coming in from the bottom.
🔧 Torque: 35 ft-lbs
Use provided blue loctite on bolts that go into flag nuts | Installation of the brackets will be very close to the exhaust pipe. Do not install while truck is warm due to risk of burning hands next to exhaust pipe. Allow exhaust to cool completely before installing.
Bolt Skid Sections Together
2

Remove Factory Plastic Skid (if Equipped)

Once the skid is assembled and bolts are tightened we can move to the truck itself. The factory plastic skid plate will need to be removed in order for the Juggernaut skid plate to be installed. Remove the (4) factory nuts holding on the skid plate shown below. You can discard the factory plastic skid, it will not be used again.
Remove Factory Plastic Skid (if Equipped)
3

Drivers Side Rear Mounting Bracket

With the factory skid plate removed we can begin installing the steel mounting brackets for the skid plate. We will start with the drivers side rear bracket that will mount on the frame rail just behind the front of the leaf spring perch. You will use one of the provided flag nuts and insert it in the hole shown below with the threaded portion facing up:
Drivers Side Rear Mounting Bracket
4

Drivers Side Rear Mounting Bracket

Take the steel bracket that has (2) 90 degree bends in it and orient it so that the angled bend is at the top to match the frame angle. The bottom bend on the bracket should be parallel to the ground. Use the provided (1) 3/8"x1.5" partially threaded bolts and (1) 3/8" washer to secure the bracket to the flag nut. It is helpful to hold the tail of the flag nut so that it will not move while you are threading the bolt into the nut. Leave this bolt finger tight for now so it can still be adjusted, all bolts will be tightened at the very end. Once installed it should look like below:
Drivers Side Rear Mounting Bracket
5

Passenger Side Rear Mounting Bracket

Next we will install the passenger side rear steel bracket. This will mount using the existing exhaust hanger bolt as shown below, this will be directly across the gas tank from the frame side bracket installed in the previous step:
Passenger Side Rear Mounting Bracket
6

Passenger Side Rear Mounting Bracket

Using a 10mm socket remove the factory bolt that holds this exhaust hanger in place. Using the steel mounting bracket that has a longer tab with a slight bend in it, place it between the frame cross member and exhaust hanger bracket. You will reuse the factory bolt to secure the brackets. Leave hand tight until the end. See installed bracket orientation below:
Passenger Side Rear Mounting Bracket
7

Passenger Side Front Mounting Bracket

Next will be the passenger side front bracket installation, this will be the next main crossmember towards the front of the truck under the bed. Another flag nut will be installed here. The tail on the flag nuts can easily be bent by hand so you can contour the flag nut to sit flat against the crossmember. Insert the nut end of the flag nut in the hole shown below: *On newer F150 models this crossmember will look slightly different. See CAD model below for where to insert the flagnut*
Passenger Side Front Mounting Bracket
8

Passenger Side Front Mounting Bracket

With the flag nut in place, find the final steel bracket that will have a 90 degree bend at the top and a 45 degree bend at the bottom. Using the provided (1) 3/8"x1.5" partially threaded bolt and (1) 3/8" washer to install the bracket to the crossmember. The final install will look like below, leave all bolts finger tight until very end.
Passenger Side Front Mounting Bracket
9

Drivers Side Front Flag Nut Install

The driver's side front will use a slot in the frame rail to mount directly to the skid plate. You will need to bend the tail of the flag nut a decent amount to align it with the slot in the frame. See pictures below for location:
Drivers Side Front Flag Nut Install
10

Skid Plate Install

Now the skid plate is ready to be installed. Either have someone help you lift it into place or you can balance the skid on a jack and raise it up to the gas tank. The drivers front side of the skid will have a flange that lines up with the flag nut that was installed in the last step. Use the provided (1) 3/8"x1.5" partially threaded bolt and (1) 3/8" washer secure the skid plate flange to the frame rail.
🔧 Torque: 35 ft-lbs
Use Blue Loctite on 3/8" bolt
Skid Plate Install
11

Attaching Skid to Mounting Brackets

The other three mounting points on the skid plate will align with the three brackets installed in previous steps. All of the the will use (1) 3/8"x1" bolt, (2) 3/8" washers, (1) 3/8" low profile nyloc nut to bolt the skid plate to the mounting brackets. This will look like the pictures below:
Attaching Skid to Mounting Brackets
12

Tighten All Bolts

With all three brackets bolted to the skid plate we can now go around and tighten all bolts to 35 ft-lbs. Installation is now complete! Enjoy your new Juggernaut USA Skid Plate
🔧 Torque: 35 ft-lbs
Tighten All Bolts

Installation Complete

Enjoy your new Juggernaut USA skid plate. Built, fabricated & assembled in Colorado — backed for life.

Rather have us do it?

Our team installs these every week at our Wheat Ridge, CO shop. Skip the garage time — book a professional install and drive away dialed in.