Install Guide

2024-2026 Ford Ranger / Ranger Raptor Skid Plate Package

2024-2026 Ford Ranger, Ranger Raptor
Part #JG-RANGER-PKG-SKID-BLK
Difficulty
Moderate
Steps
15
2024-2026 Ford Ranger / Ranger Raptor Skid Plate Package
1

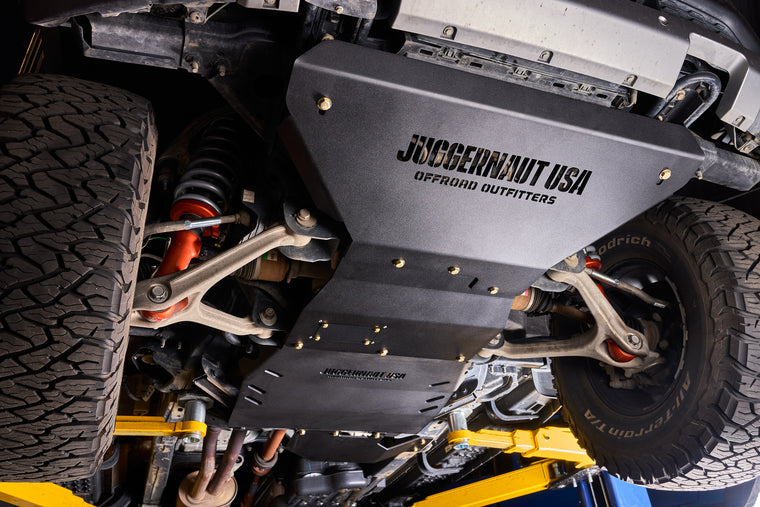
Remove Factory Skid Plates

If your vehicle is equipped with any factory skid plates or felt covers in the locations where the Juggernaut USA skid plates will be installed begin by removing those. You do not need to keep factory hardware, we provide all new hardware.
2

Front/Engine Skid Plate Install

The front/engine skid plate combo will come with a crossmember spacer that will go on the front most crossmember in front of the differential. This spacer will be installed with the provided (2) fully threaded M10x35mm bolts and washers to the factory crossmember hole locations as shown below. These holes will be pre-threaded from the factory.
🔧 Torque: 35 ft-lbs
Use Blue Loctite on Bolts
Front/Engine Skid Plate Install
3

Front/Engine Skid Plate Install

The engine skid plate will be installed first. Loosely thread the provided (3) M10 bolts and washers into the rear engine crossmember as shown circled in red below.
Use Blue Loctite on Bolts
Front/Engine Skid Plate Install
4

Front/Engine Skid Plate Install

With the (3) bolts loosely threaded in you can slide the engine skid plate into place using the slotted holes on the back to line up with the (3) bolt that were just put in. While holding the skid plate in place, use (3) more provided M10 bolts and washers to secure the front of the skid plate. (2) of these bolts will be to the spacer installed in step 1 and the third bolt will go to the factory crossmember hole. Leave all bolts loose still.
Use Blue Loctite on Bolts
Front/Engine Skid Plate Install
5

Front/Engine Skid Plate Install

Re-using the factory tow hook brackets you can install the front skid plate by sliding the slotted rear end in between the engine skid plate and washers from the bolts installed in step 4. Use the provided (2) M10 bolts and washers to secure the front of the skid plate into the factory brackets (circled below).
Use Blue Loctite on Bolts
Front/Engine Skid Plate Install
6

Front/Engine Skid Plate Install

If you are only installing the front and engine skid plates you can go back and tighten all the bolts now and installation is complete. If you are installing the transmission skid plate as well, leave all bolts loose still.
🔧 Torque: 35 ft-lbs
7

Transmission Skid Install

If continuing from front and engine skid plate install you will have the (3) bolts installed on the rear engine crossmember, if not you will need to loosely install the (3) M10 bolts and washer provided in the locations marked in red below.
Use Blue Loctite on Bolts
Transmission Skid Install
8

Transmission Skid Install

There is (1) M10 clip nut that must be installed on the transmission crossmember in the location shown below.
Transmission Skid Install
9

Transmission Skid Install

The front of the transmission skid is slotted. Slide the slots into the three bolts installed earlier above the engine skid as shown below.
Transmission Skid Install
10

Transmission Skid Install

While holding the skid plate in place there will be (1) M12 bolt and washer to install in the location shown below.
🔧 Torque: 35 ft-lbs
Use Blue Loctite on Bolts
Transmission Skid Install
11

Transmission Skid/Transfer Case Install

If installing the Transfer Case Skid Plate jump to those instructions for clip nut installation and place the transfer case skid over the remaining (3) M10 bolt locations and bolt through the transfer case skid and transmission skid to the two factory threaded location and the 1 clip nut location installed in step 8. If not installing the transfer case skid, install the (3) M10 bolts and washers in the locations shown below and tighten all bolts.
🔧 Torque: 35 ft-lbs
Use Blue Loctite on Bolts
Transmission Skid/Transfer Case Install
12

Transfer Case Skid Plate Install

Install the provided (2) M10 clip nuts in the location shown below or reuse factory clip nuts if already installed.
Transfer Case Skid Plate Install
13

Transfer Case Skid Plate Install

Install provided (1) M10 clip nut in the transmission crossmember in the location shown below. (If installing the full package, this clip nut was already installed earlier)
Transfer Case Skid Plate Install
14

Transfer Case Skid Plate Install

With clip nuts installed, place skid plate up to the vehicle as shown and use the provided (5) M10 bolts and washers to secure the skid plate.
🔧 Torque: 35 ft-lbs
Use Blue Loctite on Bolts
Transfer Case Skid Plate Install
15

Tighten Bolts

Tighten all bolts once all skid plates are lined up and installation is complete!
🔧 Torque: 35 ft-lbs
Tighten Bolts

Installation Complete

Enjoy your new Juggernaut USA skid plate. Built, fabricated & assembled in Colorado — backed for life.

Rather have us do it?

Our team installs these every week at our Wheat Ridge, CO shop. Skip the garage time — book a professional install and drive away dialed in.