1
Install Guide
2020-2026 Ford Super Duty Fuel Tank Skid Plate (F-250, F-350)
2020-2026 Ford F-250, F-350
Part #JG-SUPERDUTY-FUEL-SB-DIESEL-SKID-BLK
2
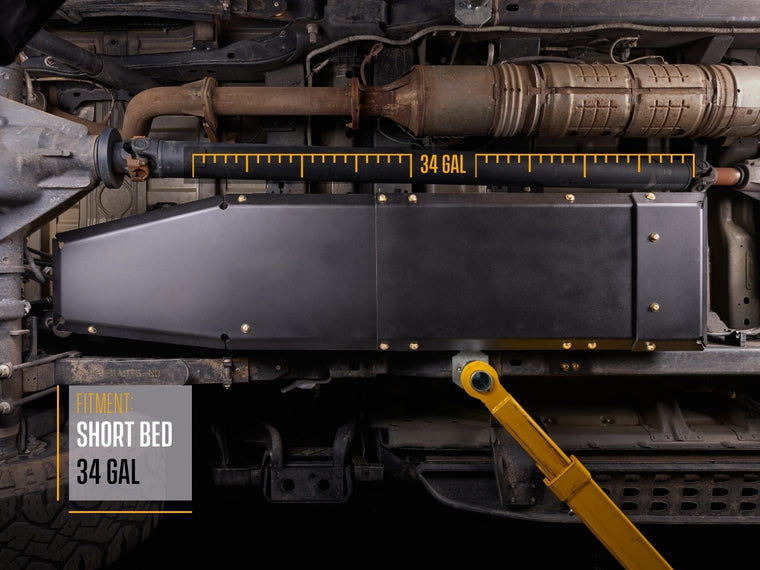
34 gal Skid Plate Pieces
See descriptions of skid plate sections below. The diesel has a tapered rear end to cover the DEF tank. The gas skid has a square rear end. See images below for orientation of skids. The rear section of the skid will go on top of the center section. (Bottom View below)
⚠Use provided blue loctite on all bolts that go into clip nuts


3
Assemble the Rear and Center Sections of your Skid Plate
Using the provided (4) 3/8x1" bolts, (8) 3/8" washers, and (4) low profile 3/8" nylock nuts attach the center skid section to the rear section with the bolts coming up from the bottom as shown below. Leave the front section off for easier access to tightening skid plate to mounting brackets. This should be done on a flat surface before skid is lifted to the vehicle.

4
Removed Factory Skid Plate (If Equipped)
If your truck is equipped with a factory skid plate this will need to be removed prior to installing the Juggernaut USA skid plate. The factory clip nuts and bolts can be reused if desired, the kit will come with all new hardware if needed or if you want to replace it with new hardware.
5
Passenger Side Front Mounting Bracket
The steel mounting brackets will be attached to the frame prior to lifting the skid plate into place. Starting with the passenger side front bracket a M10 clip nut will need to be installed in the frame crossmember in the location shown below. This is about 1ft back from the front of the fuel tank above the drive shaft.

6
Passenger Side Front Mounting Bracket
The passenger side front bracket will be installed with the provided M10 bolt and 3/8" washer with the offset going towards the front of the truck. Leave this bolt hand tight until the end so the bracket can move to align with the skid plate. See picture below for install orientation:
⚠Use provided blue loctite on all bolts that go into clip nuts

7
Passenger Side Rear Mounting Bracket
Next will be the passenger side rear bracket. This will use the (1) THICK M8 clip nut to install the bracket. The clip nut will be installed in the rearmost slot in the frame crossmember near the rear end of the fuel tank. The bracket will be installed with the provided M8 bolt and M8 washer. The offset at the bottom of the bracket will be facing the rear of the truck.
⚠Use provided blue loctite on all bolts that go into clip nuts


8
Drivers Side Rear Mounting Bracket
Next will be the drivers side rear bracket. This one installs on the frame rail between the fuel tank and the leaf spring. Use the provided thin M8 Clip nut, bolt and washer to secure this bracket to the frame rail in the location and orientation shown below. The slotted end will go against the frame rail.
⚠Use provided blue loctite on all bolts that go into clip nuts


9
Drivers Side Front Mounting Bracket
The drivers front bracket will use (2) thin M8 clip nuts, (2) M8 bolts and (2) M8 washers on the frame rail in the location shown below:
⚠Use provided blue loctite on all bolts that go into clip nuts

10
DEF Tank Mounting Bracket (Diesel ONLY)
For the diesel skid there will be an additional bracket in the rear that attaches to the DEF tank mounting on the frame rail. The factory bolt will be re-used to mount this bracket to the frame. Remove the rearmost bolt only and the DEF tank will drop down slightly. The bracket will go in between the frame and the DEF tank plastic flange and the factory bolt will be tightened to secure the bracket. See picture below.

11
Skid Plate Install
Once the brackets are all installed the skid plate can be raised into place and bolted to the brackets. It is useful to have a helping hand lifting the skid plate into place or balance it on a jack so you can lift it up to the brackets. At all bracket locations a 3/8x1" bolt, (2) 3/8" washers and a 3/8" low profile nylock nut will be used to attach the skid plate. See all locations marked below:

12
Tighten All Bolts
Once all bolts have been installed, all bolts and nuts can be tightened down to secure the skid plate.
🔧 Torque: 35 ft-lbs
13
Install Front Skid Section
The front section of the skid plate is removable and there will be (4) pre-installed rivet nuts on the front of the center skid plate section. Use the provided (4) 3/8x1" bolts and (4) washers with a dab of blue loctite on the threads to install the front section of the skid plate. This can be removed to access the fuel filters on the diesel models.
Installation is now complete. Enjoy your new Juggernaut USA Skid Plate!
🔧 Torque: 35 ft-lbs

14
48 gal Skid Plate Pieces
See descriptions of skid plate sections below. The diesel has a tapered rear end to cover the DEF tank. The gas skid has a square rear end. See images below for orientation of skids. The rear section of the skid will go on top of the center section. (Bottom View below)


15
Assemble Skid Plates
Assemble the skid plates on a flat surface. The front skid section will go underneath the center section as shown below. Use (3) 3/8"x1" bolts with washers on either side and a low profile nylock nuts to secure the skids together. LEAVE THE PASSENGER SIDE LOWER BOLT OUT IN LOCATION CIRCLED IN RED BELOW. The rear section whether gas or diesel will be bolted with (5) 3/8"x1" bolts with washers on either side and low profile nylock nuts as shown below.


16
Installing Mounting Brackets
If your truck came with any factory skid plates those will need to be removed prior to installation of the Juggernaut skid plate. Starting with the front of the skid plate we will remove the (2) factory bolts circled below. If you do not have a factory bolt and clip nut at the lower location use the provided 3/8" clip nut and 3/8" bolt-washer for this location.

17
Installing Mounting Brackets
Install the frame rail bracket in the orientation shown below on the rear most mounting location. The front mounting bracket will be installed after the skid plate is installed.
⚠Use blue loctite on all bolts going into clip nuts

18
Support Fuel Tank
The passenger side mounting bracket will use the fuel tank strap frame mount. YOU MUST USE A JACK TO SUPPORT THE FUEL TANK BEFORE REMOVING THIS BOLT. The bolt head is a 13mm socket, the factory loctite on this bolt is quite strong so it is recommended that you use a 15mm wrench or socket for the nut on top retained by the clip so the clip doesn't break. With the fuel tank supported fully remove this bolt and install the bracket as shown below. Fully tighten this bolt and hold the bracket so that it is parallel to the fuel tank. Use provided blue loctite on this bolt and torque to 40 ft-lbs. (45 deg bend on bracket has a slot now unlike the hole shown in pictures)
🔧 Torque: 40 ft-lbs
⚠Use blue loctite on all bolts going into clip nuts


19
Install Rear Mounting Brackets
Next will be the passenger side rear mounting bracket. This will use the (1) THICK M8 clip nut to install the bracket. The clip nut will be installed in the rearmost slot in the frame crossmember near the rear end of the fuel tank. The bracket will be installed with the provided M8 bolt and M8 washer. The offset at the bottom of the bracket will be facing the rear of the truck.
⚠Use blue loctite on all bolts going into clip nuts


20
Install Rear Mounting Brackets
Next will be the drivers side rear bracket. This one installs on the frame rail between the fuel tank and the leaf spring. Use the provided thin M8 Clip nut, bolt and washer to secure this bracket to the frame rail in the location and orientation shown below. The slotted end will go against the frame rail.

21
Diesel Only - DEF Tank Bracket Install
For the diesel skid there will be an additional bracket in the rear that attaches to the DEF tank mounting on the frame rail. The factory bolt will be re-used to mount this bracket to the frame. Remove the rearmost bolt only and the DEF tank will drop down slightly. The bracket will go in between the frame and the DEF tank plastic flange and the factory bolt will be tightened to secure the bracket. See picture below.

22
Install Skid Plate
Now that all but the front most drivers side frame rail bracket ar installed we can install the skid plate. All the brackets will go on the inside of the skid plate lip. The passenger side front bracket that was installed to the fuel tank strap will use the rear skid plate mating holes with the provided 3/8"x1.5" partially threaded bolts, a washer on either side and a low profile nylock nut. The rest of the brackets (circled in red below) will use the 3/8"x1" bolts, a washer on either side and the low profile nylock nuts.


23
Install Final Mounting Bracket
Install the front most bracket on the drivers side frame as shown below. Re-use factory bolt at this location on the frame rail and use the provide 3/8"x1" bolt, washers and nylock nut to secure the bracket to the skid plate.

24
Tighten All Bolts
Now that the skid plate is installed with all brackets torque bolts as specified below:
3/8" bolts -- 35 ft-lbs
M8 bolts -- 25 ft-lbs
Factory Frame Bolts -- 35 ft-lbs
25
Thank you!
Thank you for purchasing a Juggernaut USA Skid Plate and enjoy your additional protection!
Rather have us do it?
Our team installs these every week at our Wheat Ridge, CO shop. Skip the garage time — book a professional install and drive away dialed in.